DIY Gallery Wall Tutorial

So, I feel like I’m saying this ALL. THE. TIME. lately, but it’s been a crazy busy week so far here in the Mercer house!

Our handsome little man turned two this weekend and, though we didn’t plan much in terms of a party, we enjoyed a ton of family time celebrating.
Carson's Birthday

With our busy weekend, I didn’t really get started working on the gallery wall until Monday. I’m SO, SO sorry for the delay, but hopefully you’ll find that it was worth the wait!!!


The gallery wall, as it’s come to be known, is definitely a fast growing trend in home decor and for good reason, they really are a versatile way to fill a large wall space with a ton of creativity and personality!

Since moving into our house last fall, this super awkward wall in our living room has had me stumped.

Gallery Wall @ making it in the mountains

With it’s weird jump out and then back in, I’ve had no clue how to decorate it.  Enter the GALLERY WALL – I’m pretty sure if it weren’t for pinterest, this wall would remain empty and void of any personality forever!

Desperate to get some pictures up on my wall, I decided to create my own little gallery wall from the pile of frames we still had boxed up in our basement.  Fortunately Unfortunately, I don’t have a stellar picture, but this one of Brady reading a bedtime story to Carson will give you a good idea of what an epic fail it was!

How NOT to do a Gallery Wall

Turns out gallery walls aren’t as random as they may appear and there are better ways to hammer the picture hook in the right spot than trial and error … who knew?!

This time around I decided to take my time and do it right!  I chose some bigger frames to really help fill up the space (clearly that was an issue with my first try).  I played around with different layouts for weeks, leaving things set up on our guest bed and shifting pieces around every time I walked by.
Different Gallery Wall Layouts @ making it in the mountains

Originally, I was drawn to the layouts that lined up to make a perfect square – I liked how put together they looked and my facebook fans agreed when I polled them on their favorites.  Then I started looking through zillions of gallery walls on pinterest (why didn’t I think to do this at the beginning?!) and I realized that a less perfect look would not only allow me to add to it easily down the road, but it turns out I really liked that sort of haphazard, yet still collected look (you can see my favorite layouts here).  Plus, I came across these and just had to add them into the mix!

Sneek Peek Gallery Wall | making it in the mountains

So, after playing around with different layouts on the bed yet again, I finally decided on the one I thought looked best.

Just to be sure that everything would fit just right, I measured the width of the three sections of wall (divided up by that weird jut out), taped some kraft paper together to replicate that width, and laid it all out on the living room floor.  *You could totally skip this step as you’ll get another chance to move things around later before actually nailing into the wall, but with my weird wall(s), this step was extra useful.

gallery wall @ making it in the mountains

I ended up having to flip a few things around as I realized that some of the frames were going to hang over the edge of the wall.  Here’s where I finally landed.

gallery wall @ making it in the mountains

*Note: you’ll notice that the paper on the left has no frames on it – because it’s right next to the window, I’ve decided to leave that little section of wall empty until after we hang some curtains.

Next up, I traced all of my frames onto the paper and cut them out had Brady cut them out while he was relaxing on the couch watching golf (he offered!).  I marked the nail spots from the frames onto the paper cutouts and B (clearly this wasn’t a job for little 4’11 3/4″ old me) taped them onto the wall with painters tape to recreate what I had going on the floor.  *Tip: it definitely helped to have pictures of the planned layout to look back on to make sure we got everything in just the right spot.

gallery wall @ making it in the mountains

Letting it sit for the day on Tuesday gave me a chance to make sure the layout was just right and using painters tape allowed me to adjust things as needed.  Once I was absolutely sure everything was just where it should be (where was this careful thought the first time when I needed it?), all I had to do was hammer a hook into the holes I marked on the kraft paper, rip it all off and hang up our pictures.

Gallery Wall Tutorial @ making it in the mountains

I wish I could take credit for this brilliant idea, but in my search for inspiration (and my subsequent online frame shopping), I actually came across this handy video tutorial that the folks at Pottery Barn put together.  As I was doing this, I wondered many times if it would be as easy and seamless as it appeared to be in the video and, let me tell you, nobody was more surprised to learn that it absolutely was (well, maybe Brady)!

And …..

Here it is!!!

DIY Gallery Wall @ making it in the mountains

DIY Gallery Wall @ making it in the mountains

DIY Gallery Wall @ making it in the mountains

DIY Gallery Wall @ making it in the mountains

DIY Gallery Wall @ making it in the mountains

DIY Gallery Wall @ making it in the mountains

DIY Gallery Wall @ making it in the mountains

DIY Gallery Wall @ making it in the mountains

DIY Gallery Wall @ making it in the mountains

DIY Gallery Wall @ making it in the mountains

Need some inspiration for your Gallery Wall?  Here‘s a great place to start!

Already have a gallery wall in your home?  Did you plan it out or wing it?

DIY Gallery Wall Tutorial @ making it in the mountains


Sources:

Mirrored frame: Target (I couldn’t find it online)
Small silver frames: Target (here)
Wood frames: Target (here)
Cream ceramic frame: Target (couldn’t find this one online either)

The antlers, ampersand and M were purchased from The Shabby Shak on Etsy.   I won’t link to this shop simply because I don’t want people to mistakenly click on it thinking I am encouraging you to shop here.  Though I was happy with the antlers and ampersand, the letter M was sent in the wrong colour.  The owner, Angela, sent a bright white when I had actually ordered a creamy white and, because I had requested “creamy white” (as I saw here) rather than just “cream” as listed in her colour choices on this particular listing, she decided that she would only fix it for me if I paid to ship it back.  Feeling like I’d already paid a ton for shipping, I decided to suck it up and use it anyway.  I’d be lying if I didn’t say I was disappointed in not only receiving what I felt like was the wrong colour, but even more in her correspondence and the way she handled things – making me feel as though she was so busy that my order didn’t even matter to her.  I wanted to be honest about my experience with this shop and suggest that you seek out one of the many other fabulous shops that make similar wall decor.  I also want to point out that I have had many, many purchases on Etsy and this is the first and hopefully the only time I have been disappointed with my shopping experience – if you haven’t tried Etsy yet, please, please don’t let my crummy experience scare you away from scoring some amazing things that you would never find anywhere else!

Wishing you a lovely week!!!

Signature1


Shared with: From My Front Porch to Yours, The Style Sisters, Sew Crafty Cat, A Stroll Through Life, Green Willow Pond & Mostly Homemade Mom.


More Adventures with Chalk Paint: Dresser Makeover

It’s been on my to-do list for more than two years now and it feels so great to say that I’ve FINALLY painted our little antique dresser!!!

Dresser Makeover @ making it in the mountains

I introduced you to this beauty a few weeks ago when I wrote about my maiden voyage with Annie Sloan Chalk Paint HERE.  I fell in love with it when we were shopping for Baby Mercer’s nursery (*note that Baby Mercer is now almost two years old and goes by Carson).  I knew right from the beginning that I would paint it white, yet I still wanted to find a way to keep the character (read: cigarette burns) in that gorgeous wood top.  I chose to paint the base with Annie Sloan’s Chalk Paint in Old White and just a quick coat of wax over the dresser top and drawer knobs definitely brought some life back to the stained wood.  I absolutely LOVE how it turned out – the cream colour sets off the beautiful wood tones just right!

Dresser Makeover @ making it in the mountains

Dresser Makeover @ making it in the mountains

Dresser Makeover @ making it in the mountains

I am really am beyond thrilled with how it turned out!!!  So thrilled in fact, that I hate to put it back into our super boring guest room, which is definitely in need of a makeover itself.  Although I am tempted to overhaul the entire room tonight, I promised Brady myself that I would focus on one room makeover at a time.  So it seems that since I’ve already committed to making a room for Carson (you can check out what we’re planning HERE), my dreams of a luxurious guest room will have to wait.  I suppose that’s really okay because, if I’m being honest, I have absolutely no clue what I want to do with it yet anyway.

Instead staying up all night redecorating our guest room, I found a few more things to paint to tide me over:

Chalk Painted Frames @ making it in the mountains

I think these empty antique frames will look lovely grouped on the wall over the dresser (just as soon as I choose a spot for it).

Dresser Makeover @ making it in the mountains

Have you taken the Chalk Painting plunge yet?

Signature1

Featured on:


Shared with: The Style Sisters, Sew Crafty Cat, Mostly Homemade Mom, Kleinworth & Co, Tiny Sidekick, Craving Some Creativity, Twigg Studios, Nifty Thrifty Things, Tatertots & Jello, Flamingo Toes, Too Much Time on my Hands, Pieced Pastimes, Be Different Act Normal, The Charm of Home, Chic on a Shoestring, Common Ground, My Romantic Home, Liz Marie Blog, The Golden Sycamore, Jennifer Rizzo, Soho Sonnet, From My Front Porch to Yours, Stephanie Lynn, The Thrifty Groove, DIY Showoff, A Stroll Through Life, I Should Be Mopping the Floor, Mod Vintage Life, Home Stories A to Z, Cupcakes and Crinoline, Cedar Hill Farmhouse, Home Coming, Upcycled TreasuresSaving 4 Six, Green Willow Pond, & Imparting Grace.


15 Inspiring Gallery Walls that you Simply Cannot Miss!

HAPPY MONDAY!

As planned, we had a lovely and productive weekend here in the Mercer house!  We had some playtime at the park with Carson, a lovely breakfast with friends and enjoyed some walks outside taking in our gorgeous Spring weather. Even with all this fun, we were able to cross all sorts of jobs off of our to-do list and, though it was really satisfying, that part of our weekend was much too ordinary and boring to write at any length about.  So instead, I’ve found something much more fun to share:
 
15 Inspiring Gallery Walls | making it in the mountains
 
Continuing with last week’s theme of tackling projects I’ve been meaning to do for far too long, I’ve started working on a gallery wall for my living room. It had me scouring Pinterest and Houzz for inspiration and I found SO many fabulous ideas that I couldn’t help but share!  If you’re  designing a gallery wall in your home, hopefully this post will help you to get started and if you’re not, these pictures are sure to inspire you to change your mind!


I’ve shared this one before, but I’m seriously in LOVE how eclectic and comfortable it looks!


Isn’t this a brilliant idea to fill a long, empty wall?  I love how simple it is and how easy it would be to switch out the pictures and art.


This one couldn’t possibly be any more interesting or unique.


I love how nothing matches in this one, but it still somehow looks so put together.


The layers and different spacing in this one are really interesting and the wall colour absolutely makes it all pop.


I pinned this gallery wall long ago.  It is so simple, but the black and white give it a ton of dimension and impact.


 This gallery wall drew me in with it’s eclectic mixing of pieces and the bold blue wall colour.


Seriously, there’s no way I could pass this rustic gallery wall by!  With the skis and snow shoes, this would look perfect in our basement!!!


Love the clean lines in this one, especially when paired with that beautiful, rustic bench.


 Another one of my absolute faves!  I just can’t get enough of the mixed metals!  The black and white photography and the classicly styled frames help give this nontraditional layout, a very classic look.


Very simple, yet the contrast has such an impact!!!


This one is so random and the large spaces between pictures goes against everything I read, but keeping with the colour scheme makes this all work.


Young House Love did a fabulous job “wallpapering” their halls with this gallery wall!


A gallery wall without pictures … LOVE it!


Loving this eclectic mix of metals, art, photos and other interesting pieces!  You definitely need to check out the other photos at Abode Love!


As I mentioned on Friday, thanks to these inspirational ideas and my online shopping addiction, my gallery wall reveal will have to wait.  Instead this week, in between a day of teaching grade two, packing for our trip to Mexico (more on that another day) and of course getting the house spotless before I can get on a plane, I am hoping to work through a couple of projects that I can’t wait to share!


Wishing you all a lovely week!

Signature1

Like this post?  Like me on making it in the mountains facebook to follow along!

Experimenting with Chalk Paint

Finally getting those shelves up last weekend has totally inspired me to tackle some other projects that I’ve been meaning to do for what feels like an eternity. Here’s what I was up to today…

Like so many others, I’ve fallen in love with that country-chic look of a painted piece of antique furniture. Not just any old panted piece of furniture will do though, I tend to gravitate toward furniture with the more rustic look of distressed chalk paint. I really do love the idea of transforming something old and worn out into a swoon-worthy piece that can bring some personality, colour and texture to a room.

I convinced Brady to purchase this dresser from an antique store in town for our nursery when I was pregnant. It was a beautiful piece with a ton of potential … though the drawers and pulls looked like they had seen better days, I couldn’t get enough of the rustic wood top.  Even before we took it home, I had a very clear picture of how I would transform this dresser.  Two years later our son has a new dresser and that beautiful antique has been tucked away in our guest room, buried under all sorts of random stuff (everyone has some spot in their home that just seems to collect random things, don’t they?).  It’s really is such a shame to see it so under-appreciated, especially when all I can see is the amazing potential it has to add to our home.

Bedside Table Makeover | making it in the mountains4
Although I am crazy eager to get working on this piece and find a new home for it in our master bedroom, I’m pretty new to the world of chalk paint (and all things DIY really) and I really don’t want to screw this up.  Enter another project I’ve been meaning to do since the days of shopping for the nursery: this little bedside table would be a perfect practice piece for me.  Before Carson was born, I ordered this table on Amazon for the nursery and, though I’ve always liked the vintage style details, I’ve never really liked the bright white colour (a hazard of shopping online I suppose).  Painting this will not only give me a chance to learn the chalk painting ropes, but it would be a fun way to add some colour to our very bland guest room.

Bedside Table Makeover | making it in the mountains
So, here we go …

I started by removing the crystal knob and wiping down the table with a clean cloth.  Then I was ready to paint!  Seriously, because I was using chalk paint, there was absolutely no other prep involved (believe me, I triple checked!).  I chose to use this Annie Sloan Chalk Paint in Provence.

Bedside Table Makeover | making it in the mountains

The paint is thick and everything I had read said that I would likely only need one coat, but I really wasn’t happy with the brush strokes and all the white that showed through after the first coat.

Bedside Table Makeover | making it in the mountains

So, I painted a second and it looked SO much better!

Bedside Table Makeover making it in the mountains3

Chalk paint dries incredibly fast, but I wanted to give this second coat a couple of hours to really set before I distressed it.  Distressing chalk paint is incredibly easy – all it took was a few soft swipes with some sandpaper.  It’s important to use extra-fine sandpaper (I used 120 grit) as it doesn’t take much to dig through the paint.  If you do take a bit too much off, just go back over it with some paint – it’s really no big deal.

Bedside Table Makeover | making it in the mountains

After distressing, I applied a thing coat of Annie Sloan Clear Wax.  In my research, this seemed to be the trickiest part – because it changes the colour of the paint slightly as it soaks in, it can be difficult to keep an even look.  In an effort to keep things as simple as possible, I used a rag to apply really small amounts of wax and worked hard to rub every bit of it in.  I had a tough time getting a good picture of it, but here is a shot of the top of the table as I applied the wax.

Bedside Table Makeover | making it in the mountainsAnd here it is!  Taking all of these pictures in different areas (my shop, garage & guest bedroom) ended up altering the colour portrayal a bit, but this last one was the truest.

Bedside Table Makeover | making it in the mountains

I was really surprised at how easy and almost fool-proof my first experience with chalk painting furniture was.  I honestly can’t believe it was so easy – it turned out exactly as I had hoped!  I cannot wait to transform that beautiful dresser for our master bedroom!!!

Bedside Table Makeover @ making it in the mountainsSignature1

Like this post?  Like my making it in the mountains facebook page to follow along with my journey!

Shared with: Craving Some Creativity, No Biggie, Too Much Time on my Hands, DIY Showoff, Pieced Pastimes, The Blissfull Bee, It’s Overflowing, The Happy Housie, Miss Mustard Seed, The Charm of Home, Chic on a Shoestring, My Romantic Home, The Thrifty Groove, French Country Cottage, Craftberry Bush, Liz Marie Blog, Imparting Grace, From My Front Porch to Yours, Green Willow Pond, Beyond the Aisle, Maison de Pax & A Stroll Through Life

The 36th Avenue The DIY'ers

DIY Pottery Barn Picture Ledge Shelves

Happy Monday!!!  Somehow the weekend came and went in the blink of an eye.  We had a super busy Saturday shopping in Spokane, so the only useful thing we tackled on Sunday was to get those shelves up on the wall.  I am SO excited to FINALLY share this post after so many weeks of talking about it!

DIY Pottery Barn Shelves | making it in the mountains

Since turning our wedding collage picture frame into a giant bulletin board (see picture below), I needed a new way to display some of our pictures.  I bought some barn wood frames a while ago to put the pictures into, but since I wasn’t really sure where to hang them, they’ve sat stacked in the corner of our guest room for months now just waiting to be used.  When I came across this post by Shanty-2-Chic, I knew that some picture ledge shelves would be the perfect way to display our beautiful photos and frames.

DIY Bulletin Board | making it in the mountains*My DIY Bulletin Board.

Here’s what you’ll need for each shelf to make your own:

  • 2-1x4s cut to length
  • 1-1×2 cut to length
  • some screws (I used #6 x 2″ wood screws to put together the shelves and 2″ drywall screws to attach it to the wall)
  • some finishing nails
  • wood glue

I had Brady cut our wood to 3′ lengths and then I stained each piece with Minwax wood stain in Dark Walnut.

DIY Picture Ledge Shelves | making it in the mountains*Note: The 1x6s shown in this photo were used to make this DIY Art Display Hanger.

To attach our 1x4s together, I added a line of glue to bottom edge of one board and then pre-drilled through the back and screwed them together.

DIY Picture Ledge Shelves | making it in the mountainsDIY Picture Ledge Shelves | making it in the mountains

To attach the 1×2, I simply ran a line of glue along the bottom 1×4 (not the the back piece with the screws) and attached the 1×2 with some finishing nails.  That’s it … easy peasy!

DIY Picture Ledge Shelves | making it in the mountains

Although my original intention was to leave the beautiful walnut stained wood exposed, in the end, I chose to apply a coat of Annie Sloan Chalk Paint in Old White over top of the stain because (1) I didn’t like the way the colour turned out on the 1x2s and (2) I thought the white colour would contrast more with my barn wood frames.  I’ve only just begun experimenting with Chalk Paint, but I’m in love with it already!!!  It’s so easy to see why it’s become so popular … you don’t need to prepare the surface at all (though if you have raw, unfinished wood, you’ll need to shellac or stain it first), you can paint ANYTHING, it dries quickly, distresses easily and just a little paint goes such a long way.

Here’s what the shelves looked like after the first coat of chalk paint.

DIY Picture Ledge Shelves | making it in the mountains

And after the second coat.

DIY Picture Ledge Shelves | making it in the mountains

I also chose to sand it down a bit to give it more of a distressed, rustic look.  I absolutely love the way the dark stain shows through!

DIY Picture Ledge Shelves | making it in the mountains

To hang these babies on the wall, I screwed a couple of 2″ drywall screws through the shelves into the wall studs.  It didn’t really matter to me that the screws into the wall were visible because they would be covered with pictures anyway, but you could always nail some art hooks onto the back if you didn’t want them to be visible.

Shelves

Finally, it was time to pile them full of pictures!

DIY Picture Ledge Shelves | making it in the mountains

I am so in LOVE with how these turned out!!!

DIY Picture Ledge Shelves | making it in the mountains

Signature1

Like this post? Then, don’t miss a beat! Like my making it in the mountains facebook to follow along with my journey!

Shared with: Sew Crafty Cat, Kleinworth & Co, Craving Some Creativity, Saving 4 Six, No Biggie, Too Much Time on my Hands, DIY Showoff, Pieced Pastimes, The Blissful Bee, It’s Overflowing, Miss Mustard Seed, The Charm of Home, Chic on a Shoestring, My Romantic Home, The Thrifty Groove, French Country Cottage, Craftberry Bush, Liz Marie Blog, Imparting Grace, From My Front Porch to Yours, Green Willow Pond, Maison de Pax, A Stroll Through Life, I Should be Mopping the Floor, Mod Vintage Life and Elizabeth Joan Designs.

The 36th Avenue The DIY'ers

8 DIY Plank Wall Tutorials

Our first project for Carson’s new room will be a plank wall and, with our very limited DIY experience, it is nothing short of daunting.  With no clue where to start, I’ve been scouring the internet in search of as much direction, help and advice as possible.  There are a ton of fabulous tutorials out there and a zillion ways it seems to get the look.  The most cost effective option is to use plywood cut into strips, though the Monica Geller in me isn’t really fond of the impossible to clean, deep gaps between the boards and this particular method also seems to leave the most room for error.  I did also find a tutorial that uses 1x4s nailed to the walls, which also creates those deep gaps, but would be most similar to using actual reclaimed wood.  I think the best option for us would be to go with tongue and groove planks – although this is the most expensive DIY option, it also appears to be the most user friendly and in the end, I’d rather spend a bit more money to ensure that we are happy with the way it all turns out.  With SO many tutorials out there, I thought I’d share some of my favorites:
Best Plank Wall Tutorials | making it in the mountains
 
 
Tutorials using tongue and groove planks:

DIY Plank Wall

DIY Plank Wall

DIY Plank Wall

DIY Plank Wall
 
 
Tutorials using planks cut from plywood:

DIY Plank Wall

DIY Plank Wall

DIY Plank Wall
 
 
Tutorial using lumber planks:

DIY Plank Wall
 
 
I really think this is going to add that rustic feel that we are going for and I can’t wait to get started!
Signature1

Like my post? Like me on making it in the mountains facebook

Shopping for an Outdoor Dining Set

Shopping for an Outdoor Dining Set
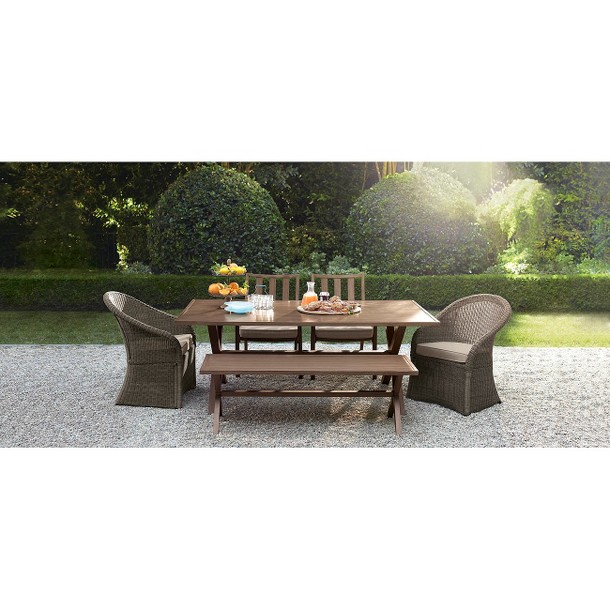
With the sun shining and the temperatures creeping up, Spring finally seems to be rolling in! Summer won’t be far behind and let me tell you, there is nothing as beautiful and lovely as summer in the Kootenays! Already, I find myself dreaming about breakfasts outside in the warm summer sun, taking in the amazing mountain views. At the moment our yard is a big, messy pile of snow & mud and, with a million other things to spend our money on this summer, the best we can hope for is a big, messy pile of dirt … so, when we’re not out hiking or biking, we will likely be enjoying the great outdoors on our courtyard deck. Without a place to sit or even set down a drink, it’s not an easy place to relax. Enter the outdoor dining set.

Originally, I figured we’d shell out $500 for a decent dining set up and enjoy it for years to come; however, it seems (like so many other things), I greatly underestimated what it would cost to get even a simple table and some chairs. I could go to ikea or Walmart and find a smaller, less expensive set to get us through the summer for $300-$500 and it would do the job, but I just can’t bring myself to spend so much on something that will be so temporary. So instead, I’ve adjusted our budget to $1000 (*ish).  I’m picturing something with a wood or wicker look, but we need something that will stand up to the elements on our uncovered deck and I’m not really open to doing a ton of maintenance every year, so I’m thinking faux wood and resin wicker will work best for us.

I thought I’d share some of my favorite options. If you’re hunting down an outdoor dining set this Spring too, hopefully this will help get you started!

Seating for 4:

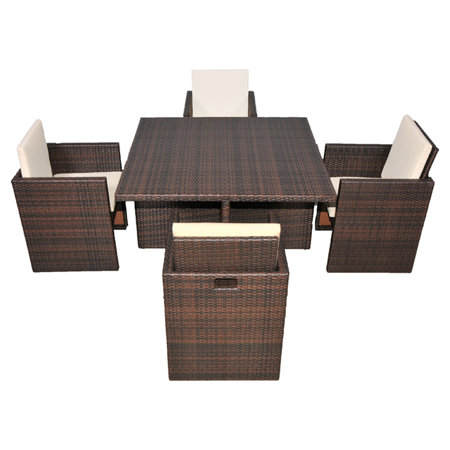
Joss and Main has this 5 piece dining set for $1090 right now, which really seems like a steal when comparing it to similar sets!  I absolutely love the idea of being able to tuck everything away from the elements so easily!

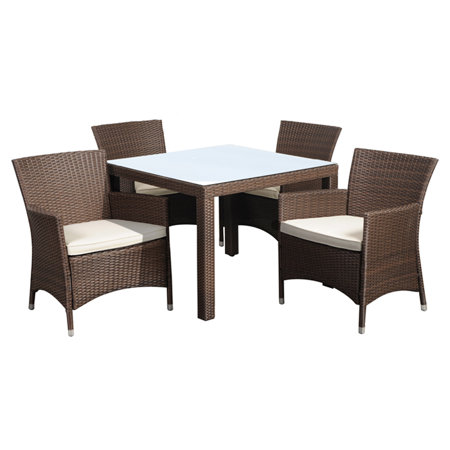
Another 4 seater option from Joss and Main for only $790.  I like the substantial chairs and the table has got a classic look, but unfortunately, it’s a bit small for us.

Seating for more:

Home Depot has this 7 piece set for only $855.  That’s a faux wood table (so no maintenance) and the chair cushions and lumbar pillows are included in this price.

campagnia-monza_1

This option came from an unexpected place … Jysk.  At $699, this set seems like an amazing deal!  The black wicker looks a bit more contemporary and I’m loving the shape of the chairs.

If you have a bit more to spend:

At $1338.00, This is definitely over budget, but I really do love the idea of being able to tuck away the chairs easily, which will really help to keep them clean and dry.  Unfortunately, no cushions for these ones.

This faux wood table and the resin wicker chairs are exactly what I’m looking for!  It comes in a bit over our budget at $1599 from Hayneedle.

Coming in at $1836, this set up isn’t really an option for us, but I couldn’t help but share the brilliant way everything folds and tucks under the table!

Though I’m not so sure about the wood construction, I do love the classic look of this set.   I also really like that I could purchase a couple of wicker chairs for each end down the road to expand this set for 6 people.  This set is slightly over our budget at $1270, but isn’t completely unreasonable to consider.

A girl can dream:

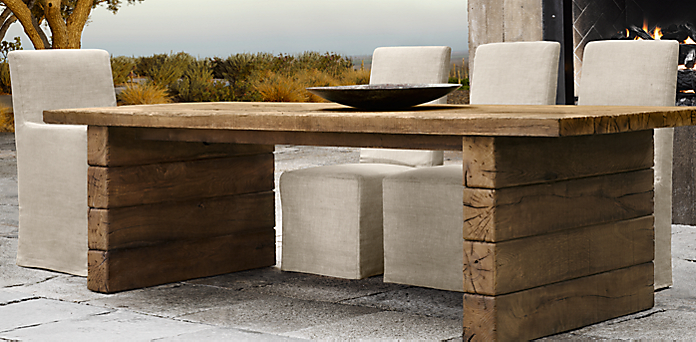
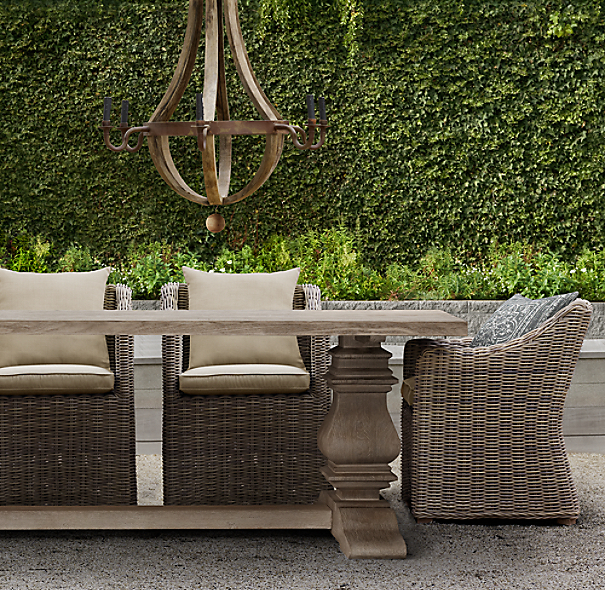
If you have thousands to spend, and a covered space to protect your investment, then these options from Pottery Barn and Restoration Hardware should absolutely top your list!  SO gorgeous!!!

DIY option:

I truly love the idea of building our own set!  This way we could really get the look we’re going for and, not only would we save some money, but we would appreciate them so much more.  I’m not afraid to put the work in (not sure hubby agrees with me here), but I don’t love the fact that we would have to put work into maintaining the beauty for years to come.


With a bit of digging, I was able to find a ton of choices that would work for us.  I really like the idea of building our own set … with all of the building plan options available online, there’s no doubt we could find something resembling one of the dream tables from Restoration Hardware or Pottery Barn.  With a couple of benches and a a pretty wicker chair at each end, I think it could look really great!

If we do decide to buy, this is perhaps my favorite option … at $906 it comes in under budget and I really love the mix of the metal and wicker.   With the rustic looking table and bench, the metal chairs and the wicker, this set is exactly what I was picturing!  Added bonus: with a throw cushion or two, those wicker chairs would be a comfy place to curl up on the deck with a book!

Would LOVE to hear what you think would look best on our little courtyard deck?

House | making it in the mountains

Signature1

Our first DIY project – a Rustic Art Hanger

I came across this post by Liz Marie Blog on Pinterest a few weeks ago and it looked so do-able I figured it would make a great first DIY for us!

And so, I sent Brady to the hardware store that day to pick up the lumber. We bought 2 – 1x6s and hubby cut them to 8′ lengths for me. I picked up a small can of Minwax wood stain in Dark Walnut and, after sanding down the raw edges on each end, I got to work. After letting the first coat dry on one side, I noticed that there was A LOT of unevenness to the colour that I wasn’t exactly thrilled with.

Rustic DIY Art Display Hanger  making it in the mountains*NOTE: There are some extra boards pictured here that I stained for another project that I’m working on*

I had read about using a pre-stain in my research for yet another project I’m planning, but thought that it would be overkill on such a small project as this. Upon seeing this first coat, I changed my mind. So, I dug out my can of Minwax Pre-Stain Wood Conditioner and painted it on the other side. With my first coat of stain, I could already see a big difference between the two sides … LESSON LEARNED! And with that, it was decided that this side would definitely be the front of my project. 😉

Rustic DIY Art Display Hanger  making it in the mountains

After another coat on each side, I let the boards dry for a couple of days (I gave them some extra time as they were sitting outside in our unheated garage). I screwed some eye bolts into the front – one centered on either end and one in the middle – and tied a string of twine through each one. I then hammered some art hangers onto each end of the back to hang it with.

Rustic DIY Art Display Hanger  making it in the mountains

All that was left to do was put them up on our “office” wall and hang some art to display.

Rustic DIY Art Display Hanger  making it in the mountains

Rustic DIY Art Display Hanger  making it in the mountains

I’m just SO thrilled with how they turned out! What a fabulous way to display Carson’s artwork!

DIY Art Display Hanger | making it in the mountains

Signature1

Featured on

Like this post? Then, don’t miss a beat! Like my making it in the mountains facebook to follow along with my journey!

Shared with: Kleinworth & Co, Craving Some Creativity, Saving 4 Six, No Biggie, DIY Showoff, Pieced Pastimes, Delineate Your Dwelling, It’s Overflowing, The Blissfull Bee, Too Much Time on my Hands, Miss Mustard Seed, The Thrifty Groove, Liz Marie Blog, Imparting Grace, From My Front Porch to Yours, Green Willow Pond, A Stroll Through Life, Jennifer Rizzo, Craftberry Bush, Romantic Home, French Country Cottage, Nifty Thrifty Things, Common Ground, Twigg Studio, Flamingo Toes, Chic on a Shoestring, Soho Sonnet and Dimples & Tangles.

The 36th Avenue The DIY'ers

Shopping for our Sectional

Oh boy, this is clearly going to be a process!  With SO many options and SO much money on the line, the two most indecisive people in the world are going to need some time, lots of time I’m sure, and probably a little help too.

Here’s what we know:  We like charcoal – something with a dark grey colour and some texture to it.  We are also quite sure that we want a “U” shape with two comfy corners to snuggle in.  Lastly, there is no question that we need the back cushions to be loose so that we can move and rearrange them into a comfy nest.

Here’s what we still need to decide:  Do we want a modern or traditional look?  Do we really need the massive sofa that I’m envisioning?  Will we need to spend a small fortune to get what we want?  Is it even smart to spend a small fortune when we will have kids that in all likelihood will wreak havoc on the poor thing?  We also need to figure out the layout of our space (apparently hubby and I have different visions of where everything will go – who knew?) – clearly this is key to figuring out the best configuration for the sofa.

Here’s what we found:  Living in a rural area doesn’t leave us with a ton of shopping options, but we did find one local store (and by local, I mean 1 hour away), Kootenai Moon Furniture, that we really liked.  They didn’t have much for us to see in the showroom, but they did look through some catalogs with us.  To be honest, I’m not sure that we could really purchase a sofa without actually sitting on it (how could we possibly be sure it would fill the role of big, comfy couch?), but judging solely on appearance, which seems to be our only available tool at the moment, we narrowed it down to two options both made by the same Canadian company.

The Jacob was the sofa that the store staff was most excited about, simply because of the sale price they could offer, which was about 1/2 the cost of the others that we looked at.  We liked that we could customize the configuration and fabric, but really didn’t care for the super wide arms.

The Harry had a look that suited our tastes better and offered the same options for customization, but was double the price.

I couldn’t of course take any photos of couches that weren’t there, but I did snap some pics of our favorite fabric options:

To be honest, I’m not sure that either of these is the perfect couch for us, but the experience certainly helped us to better understand what we are looking for and it was definitely fun to start looking 🙂  Looking forward to checking out what Kelowna and Spokane might have to offer next!

I’ll leave you with a photo of our little guy … clearly he had a long day of shopping too!
Carson Shopping | making it in the mountains
Signature1

Carson’s Bedroom: Here’s the Plan

Feeling overwhelmed with having an entire house to decorate, it was hard to know where to start.  We have so many ideas running through our heads!  My ever sensible hubby suggested going one room at a time … this of course, is obvious and logical in hindsight, which is probably why it never occurred to me.  We can focus our energy on one room at a time, one project at a time.  Now that we know how we are going to manage my need to change everything about this house, we have chosen to start with Carson’s room as that is really the only room that I have a clear idea of what I want.  And so we’ve begun planning out a room that can grow with our little man with some fun, rustic touches.

So here’s what we’re thinking:
Carson's Room Board | making it in the mountains
Carson's Furniture | making it in the mountains

We knew we wanted a old lodge feel, so it all started with this plank wall tutorial.  Originally, I pictured red and navy blue plaid, but I came across this pillow at One King’s Lane and fell in love with the bright blues and greens that I hadn’t considered.  We like the idea of a rustic mountain retreat that Carson won’t outgrow in a few short years and these gave us a jumping off point.

The wall colour that we are leaning towards is called “Fair Lady Kelly” (otherwise known as AC158), though we aren’t absolutely sure yet, as we’re a bit worried it may look too dark.  I like the idea of the old cabin feel of this bedding set I found at Ikea – don’t you think it would look perfect with a wool army style blanket thrown over the end of the bed?  I thought this black bed from Ikea would dress things up a bit, but still coordinate with the bookshelf and dresser we had made for him last year (I posted some old pictures from his nursery below the design board).  This rustic pendant light from Barn Light Electric and a black roller blind would be a great way to bring more black into the room, which I’m hoping will help it all come together with a sophisticated feel.

Now for the fun part!  I found these antler hooks on Etsy and the wall racks with baskets here & here – I think they would be a great way to give C some extra storage.  Some faux taxidermy like this would give the wall above his bed some interest and, along with some other moose themed art scattered on the walls and bookshelf throughout his room, I think it will give it the mountain feel we’re going for.  Finally, in the corner I picture a black chair like this with some fun colour or pattern like this moose print pillow.

Things always seem to look SO much better in my head, so we’ll have to see how this all comes together.  Regardless, we’re really excited to get started!

Signature1